

This picture is of a Pentium Classic CPU core I removed from it's ceramic packaging.
Here's how I did it. I put the CPU in a vice very carefully and used a fresh, sharp razor blade and hammered it to cleave off all the pins. This looks nice, but it messy to clean up. However, it's needed for the next step.
I then took the razor blade and hammered it between the gold plate covering the bottom of the CPU and the ceramic it's glued it. If you're very careful, you can do this without harming the CPU core inside.
Once that's off you've got a nicely exposed core. However, it's still attached to the ceramic behind the CPU.
I wish I could tell you how it did it, but I can't. It just popped off one day. Since the ceramic was cracked and smashed behind it, there was a tiny bit of core exposed. I guess that was all that was needed. Perhaps I'll get a boatload more someday and try to see how to pop out the core without cracking or annihilating it.
For now, just having a collection of 386, 486, and 586 core's exposed is great!
Also, the Flickr to Google blogger tool works well, as I used it to make this post. But you probably knew that.
Wednesday, December 31, 2008

DeoxIT FaderLube - Really Works!
For years I've been fixing and trying to fix lots of everything. I'm that guy that people bring their broken stuff to.
However, there's one thing I never could get quite right. Volume controls, and other pot (potentiometer) based controls. I'd manage to get the crackle out, but if always came back within a short while. I'd even take the entire pot apart, clean each piece manually, and put it all back together. But even then, it was never quite right.
I tried WW-40 but that's stinky and yucky and generally not the best idea. I'd try 99% Isopropyl alcohol and that would work for a while, but generally not long. I even went to Radio Shack and got their "Tuner Cleaner" or whatever it's called (they also have a "Contact Cleaner") but that never seemed to do the trick either. In fact, it left a greezy film on the board, which was almost unavoidable since the spray can would go off like a rocket and hose down just about everything in the immediate area of the room (walls, floors, your face, whatever).
I even tried a few electronics cleaners from Canadian Tire, but without any better results. Everything barely worked.
For a while, before playing a game of Super Breakout on the Atari VCS, I'd take the big knob off and drop a few dips of alcohol into it, which would last only as long as the game. Plus, since my cleaning process removed the original lubrication of the pot, it would turn as smoothly. You can see the effect of all this while playing the game, the player paddle at the bottom of the screen would wiggle and wobble and generally react jerky and poorly during gameplay.
I've been reading a lot of online forums and blogs and whatnot, when I finally started reading about the DeoxIT line of products. They seemed great, and I finally managed to get my hands on some.
It's truly and wonderfully great. It's exactly right. It cleans and lubricates and lasts. You can see the difference in the video game controllers onscreen, and you can hear the difference in the volume controls. It's amazing. When compared to all the other crap I used, it simply kicks everything else in the butt. It's as great as everyone on the internet says it is. It lives up to the hype. I wish I had this stuff years ago. I want to treat everything in the house I have with it. It's really that great.
Here's a picture of the stuff I've used it on so far with great results.
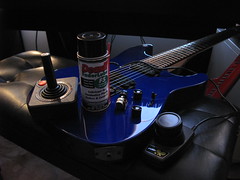
I fixed a flaky Atari joystick, Atari paddles, and guitar plugs, pots and switches so far.
Plus, the spray nozzle at the top has a selector for how hard you want the spray to come out.
This is a great feature, since I figure I waste about %50 of and entire bottle of the old junk I used just because it hosed down everything in sight with one burst.
If you really want to make it last without wasting it, you can try what I like. I get an old bottle of eye drops, nasal spray (remove the hose inside to keep it from spraying up), or whatever small bottle that will let you drip it out, clean it and carefully fill it from the spray can. Now you can use a few drops when you need to, and wash out a pot in a hard to reach spot with the can if needed, and minimize waste. What's good for the environment is usually good for your wallet.
I wasn't paid to promote this. I believe it's a great product and it helps restore and repair electronics so you can lengthen their life and stretch your dollar.
Having said that, it's not cheap. You can order a diluted solution F5 can like mine from their website.
DeoxIT FaderLube at Caig.com
They also have 100% pure stuff in a tiny tube and squeeze bottle. It's actual pure lubricant and drips out thick and slow like honey.
It's great. Gets the crackle out. Honestly wonderful stuff.
However, there's one thing I never could get quite right. Volume controls, and other pot (potentiometer) based controls. I'd manage to get the crackle out, but if always came back within a short while. I'd even take the entire pot apart, clean each piece manually, and put it all back together. But even then, it was never quite right.
I tried WW-40 but that's stinky and yucky and generally not the best idea. I'd try 99% Isopropyl alcohol and that would work for a while, but generally not long. I even went to Radio Shack and got their "Tuner Cleaner" or whatever it's called (they also have a "Contact Cleaner") but that never seemed to do the trick either. In fact, it left a greezy film on the board, which was almost unavoidable since the spray can would go off like a rocket and hose down just about everything in the immediate area of the room (walls, floors, your face, whatever).
I even tried a few electronics cleaners from Canadian Tire, but without any better results. Everything barely worked.
For a while, before playing a game of Super Breakout on the Atari VCS, I'd take the big knob off and drop a few dips of alcohol into it, which would last only as long as the game. Plus, since my cleaning process removed the original lubrication of the pot, it would turn as smoothly. You can see the effect of all this while playing the game, the player paddle at the bottom of the screen would wiggle and wobble and generally react jerky and poorly during gameplay.
I've been reading a lot of online forums and blogs and whatnot, when I finally started reading about the DeoxIT line of products. They seemed great, and I finally managed to get my hands on some.
It's truly and wonderfully great. It's exactly right. It cleans and lubricates and lasts. You can see the difference in the video game controllers onscreen, and you can hear the difference in the volume controls. It's amazing. When compared to all the other crap I used, it simply kicks everything else in the butt. It's as great as everyone on the internet says it is. It lives up to the hype. I wish I had this stuff years ago. I want to treat everything in the house I have with it. It's really that great.
Here's a picture of the stuff I've used it on so far with great results.
I fixed a flaky Atari joystick, Atari paddles, and guitar plugs, pots and switches so far.
Plus, the spray nozzle at the top has a selector for how hard you want the spray to come out.
This is a great feature, since I figure I waste about %50 of and entire bottle of the old junk I used just because it hosed down everything in sight with one burst.
If you really want to make it last without wasting it, you can try what I like. I get an old bottle of eye drops, nasal spray (remove the hose inside to keep it from spraying up), or whatever small bottle that will let you drip it out, clean it and carefully fill it from the spray can. Now you can use a few drops when you need to, and wash out a pot in a hard to reach spot with the can if needed, and minimize waste. What's good for the environment is usually good for your wallet.
I wasn't paid to promote this. I believe it's a great product and it helps restore and repair electronics so you can lengthen their life and stretch your dollar.
Having said that, it's not cheap. You can order a diluted solution F5 can like mine from their website.
DeoxIT FaderLube at Caig.com
They also have 100% pure stuff in a tiny tube and squeeze bottle. It's actual pure lubricant and drips out thick and slow like honey.
It's great. Gets the crackle out. Honestly wonderful stuff.
Tuesday, December 30, 2008
iPod Mini Repearing - Soldering an SMD connector on a ribbon cable
I recently tried fixing an iPod Mini. It's not entirely simple. The hard part is getting the unit apart. There's two main pieces that go in when the manufacture the device. The first is the main board with battery and screen. The second is the thumb wheel keypad. They must first slide that in, then the main board, then finally connect the two.
The problem is, the connector is a very tiny surface mount device on a ribbon connector, so when you try to unplug it, since you can't get a screwdriver in there, you end up ripping the flat ribbon wire away from connector while it's still plugged in.
I've dealt with this kind of thing before, and since it happened again I came up with another way of fixing it which I'd thought I'd share for anyone who might be interested.
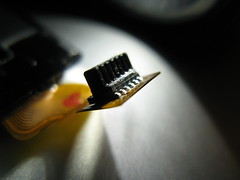
In the first picture you see the leg of the connector separated from the ribbon wire.
The second leg ended up getting pulled off the plastic ribbon as well, but the trace was still connected to the leg so it's fine. I used a little super glue (crazy glue) to try and keep things together a bit better. I was afraid I might end up insulating the wire but that didn't end up being an issue.
I tired some rear window defroster paint to connect the leg to the trace, but it didn't have any grip on anything so it wasn't an option.
Here's what I did. Since I haven't yet Dremeled a fine point on my soldering iron tip for SMD work, I didn't want to use the soldering iron. Based on past experience, I've noticed that it's too easy to overheat the ribbon connector and melting the whole thing.
Step 1 - I used a pair of pliers to hold the part down. I didn't want to use my vice as it would probably scratch or break the part.
Step 2 - I wrapped copper wire around some tweezers and make coil in the middle of the wire coming off of the end of the tweezers.
Step 3 - I then cut a tiny piece of solder and placed it carefully beside the leg of the connector.
Here's a picture of solder piece.

Step 4 - I used a butane mini-soldering torch to heat the copper wire coil until it and the end of the wire was red hot.
Step 5 - I placed the tip of the hot wire against the piece of solder and leg until it melted and fused with the leg and ribbon trace.
Step 6 - Pulled away as soon as the solder was flowing.
Here's a picture of the setup, complete with glowing hot copper wire.

And here's a picture of the result.

Now, why would someone want to do this instead of another solution? Well, I noticed that the copper wire at the tip cools down very quickly, so it's harder to over heat the ribbon. Since the tip isn't a fine point narrowing from a larger shaft, there also probably isn't a large amount of heat coming off the rest of a soldering iron.
I also believe that, while heated the copper wire gets **much** hotter than the soldering iron. So, you've got the ability to heat a tiny part up to a very high temperature, in a very tiny area, with the ability to pull away and let it cool down fairly quickly as well, which gets the solder flowing, but then lets you stop things before they get too hot.
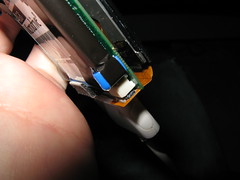
Here's the final part, repaired and plugged into the iPod Mini.
So, if you rip this sucker apart, maybe this might help. Although you just can't beat a temperature controlled and finely tipped soldering iron for SMD work.
:)
The problem is, the connector is a very tiny surface mount device on a ribbon connector, so when you try to unplug it, since you can't get a screwdriver in there, you end up ripping the flat ribbon wire away from connector while it's still plugged in.
I've dealt with this kind of thing before, and since it happened again I came up with another way of fixing it which I'd thought I'd share for anyone who might be interested.
In the first picture you see the leg of the connector separated from the ribbon wire.
The second leg ended up getting pulled off the plastic ribbon as well, but the trace was still connected to the leg so it's fine. I used a little super glue (crazy glue) to try and keep things together a bit better. I was afraid I might end up insulating the wire but that didn't end up being an issue.
I tired some rear window defroster paint to connect the leg to the trace, but it didn't have any grip on anything so it wasn't an option.
Here's what I did. Since I haven't yet Dremeled a fine point on my soldering iron tip for SMD work, I didn't want to use the soldering iron. Based on past experience, I've noticed that it's too easy to overheat the ribbon connector and melting the whole thing.
Step 1 - I used a pair of pliers to hold the part down. I didn't want to use my vice as it would probably scratch or break the part.
Step 2 - I wrapped copper wire around some tweezers and make coil in the middle of the wire coming off of the end of the tweezers.
Step 3 - I then cut a tiny piece of solder and placed it carefully beside the leg of the connector.
Here's a picture of solder piece.
Step 4 - I used a butane mini-soldering torch to heat the copper wire coil until it and the end of the wire was red hot.
Step 5 - I placed the tip of the hot wire against the piece of solder and leg until it melted and fused with the leg and ribbon trace.
Step 6 - Pulled away as soon as the solder was flowing.
Here's a picture of the setup, complete with glowing hot copper wire.
And here's a picture of the result.
Now, why would someone want to do this instead of another solution? Well, I noticed that the copper wire at the tip cools down very quickly, so it's harder to over heat the ribbon. Since the tip isn't a fine point narrowing from a larger shaft, there also probably isn't a large amount of heat coming off the rest of a soldering iron.
I also believe that, while heated the copper wire gets **much** hotter than the soldering iron. So, you've got the ability to heat a tiny part up to a very high temperature, in a very tiny area, with the ability to pull away and let it cool down fairly quickly as well, which gets the solder flowing, but then lets you stop things before they get too hot.
Here's the final part, repaired and plugged into the iPod Mini.
So, if you rip this sucker apart, maybe this might help. Although you just can't beat a temperature controlled and finely tipped soldering iron for SMD work.
:)
Subscribe to:
Posts (Atom)