

The problem is, the connector is a very tiny surface mount device on a ribbon connector, so when you try to unplug it, since you can't get a screwdriver in there, you end up ripping the flat ribbon wire away from connector while it's still plugged in.
I've dealt with this kind of thing before, and since it happened again I came up with another way of fixing it which I'd thought I'd share for anyone who might be interested.
In the first picture you see the leg of the connector separated from the ribbon wire.
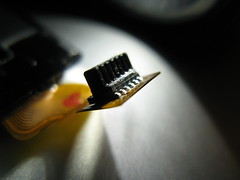
The second leg ended up getting pulled off the plastic ribbon as well, but the trace was still connected to the leg so it's fine. I used a little super glue (crazy glue) to try and keep things together a bit better. I was afraid I might end up insulating the wire but that didn't end up being an issue.
I tired some rear window defroster paint to connect the leg to the trace, but it didn't have any grip on anything so it wasn't an option.
Here's what I did. Since I haven't yet Dremeled a fine point on my soldering iron tip for SMD work, I didn't want to use the soldering iron. Based on past experience, I've noticed that it's too easy to overheat the ribbon connector and melting the whole thing.
Step 1 - I used a pair of pliers to hold the part down. I didn't want to use my vice as it would probably scratch or break the part.
Step 2 - I wrapped copper wire around some tweezers and make coil in the middle of the wire coming off of the end of the tweezers.
Step 3 - I then cut a tiny piece of solder and placed it carefully beside the leg of the connector.
Here's a picture of solder piece.

Step 4 - I used a butane mini-soldering torch to heat the copper wire coil until it and the end of the wire was red hot.
Step 5 - I placed the tip of the hot wire against the piece of solder and leg until it melted and fused with the leg and ribbon trace.
Step 6 - Pulled away as soon as the solder was flowing.
Here's a picture of the setup, complete with glowing hot copper wire.

And here's a picture of the result.

Now, why would someone want to do this instead of another solution? Well, I noticed that the copper wire at the tip cools down very quickly, so it's harder to over heat the ribbon. Since the tip isn't a fine point narrowing from a larger shaft, there also probably isn't a large amount of heat coming off the rest of a soldering iron.
I also believe that, while heated the copper wire gets **much** hotter than the soldering iron. So, you've got the ability to heat a tiny part up to a very high temperature, in a very tiny area, with the ability to pull away and let it cool down fairly quickly as well, which gets the solder flowing, but then lets you stop things before they get too hot.
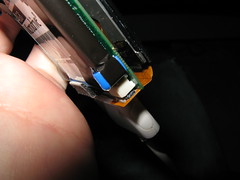
Here's the final part, repaired and plugged into the iPod Mini.
So, if you rip this sucker apart, maybe this might help. Although you just can't beat a temperature controlled and finely tipped soldering iron for SMD work.
:)